Hi Guys:
Have tank off ( fitting multi fuse block under seat) so have decided to replace fuel filter. '04-r1150r
Have searched around for advise/tips on the filter replacement.
Know I've see it but now can't seem to locate it. Have filter /large O- ring, but wondeing if new clamps are needed on hoses?
P.S. Put "Small Parts" disconnects on over a year ago. No problems with them over several tank removals..
-Alan
Fuel Filter Replacement.
Moderator: Moderators
Alan,
If the fuel filter has the oem clamps, then yes, you'll need to replace them since w/o a special tool, you'll most likely mangle the clamps when trying to remove them. I replaced mine with fuel injection clamps - 5/16" ID - which btw is the same size you probably used for the quick disconnects. Anyway, just make sure they are the fuel injection type clamps.
Before taking the fuel assembly out, mark for reference a spot on the tank and another on the fuel assembly so that it all lines up properly when you put it back in. When you take the fuel assembly out, some twisting is needed as the contraption is quite large - take a look at the photo posted below and you'll see what I mean. Also make sure the arrow on the new filter is facing away from the fuel pump when attaching the hoses to the filter. When you're done attaching the new filter, twist it all back into the tank, making sure your reference marks line up. One word of caution : be very careful when tightening down the six bolts that secure the fuel assembly to the tank. They only need to be a bit more than finger tight - no more that 6 or 7nm - since they strip very easily as I found out the hard way. You just want a good seal with the o-ring. After tightening the 6 bolts, put some gas in the tank, and turn it on it's side for a few minutes to test the seal - if no leaks, then you're free to attach the tank back to the frame.
Hope that helps!

If the fuel filter has the oem clamps, then yes, you'll need to replace them since w/o a special tool, you'll most likely mangle the clamps when trying to remove them. I replaced mine with fuel injection clamps - 5/16" ID - which btw is the same size you probably used for the quick disconnects. Anyway, just make sure they are the fuel injection type clamps.
Before taking the fuel assembly out, mark for reference a spot on the tank and another on the fuel assembly so that it all lines up properly when you put it back in. When you take the fuel assembly out, some twisting is needed as the contraption is quite large - take a look at the photo posted below and you'll see what I mean. Also make sure the arrow on the new filter is facing away from the fuel pump when attaching the hoses to the filter. When you're done attaching the new filter, twist it all back into the tank, making sure your reference marks line up. One word of caution : be very careful when tightening down the six bolts that secure the fuel assembly to the tank. They only need to be a bit more than finger tight - no more that 6 or 7nm - since they strip very easily as I found out the hard way.
Hope that helps!
Alan --
Having just replaced my fuel filter - and having used Taosports great photo to help - I can second his advice. Though it looks tough, the job is actually pretty easy. The hardest part is getting everything out of the tank, followed closely by getting things back in. It's also a bit of PITA to cut off the stock Oeticker clamps. Just take your time and as Taosports advises, take care tightening down the nuts on the mounting plate.
Charlie
'03 R1150R
Life member 365
Errabundi Saepe, Semper Certi
Life member 365
Errabundi Saepe, Semper Certi
-
boxermania
- Quadruple Lifer
- Posts: 3644
- Joined: Thu Mar 17, 2005 6:37 pm
- Location: Baton Rouge, LA.....aproaching retirement
Michael
Excellent picture and quite helpful to the other users.
Even though I don't know you personally, I know, by the posts, that you are intimate with the operation/maintenance of your bike and therefore a good guy in my book.
I want to tease you by commenting that if I didn't know better, the clamps on the quick connects (in your picture) are of the old (original) style.....tst....tst....
Forgive me, but one of my main functions is that of failure analysis and I tend to look everywhere.......
Member #312
06 Suzuki Burgman 650 "state of flux"
79 CBX
06 Suzuki Burgman 650 "state of flux"
79 CBX
Good eye Boxermania! But, I don't really deserve the tst.....tst... You all have frightened me into getting the Omegas. I have them in hand, ready to install.boxermania wrote:...I want to tease you by commenting that if I didn't know better, the clamps on the quick connects (in your picture) are of the old (original) style.....tst....tst....
Literally in hand.
See!

Just waiting for my odometer to click to 48,000 miles (1K to go) so that when I replace my fuel filter again, I can replace the brittle plastic quick connects.
-
boxermania
- Quadruple Lifer
- Posts: 3644
- Joined: Thu Mar 17, 2005 6:37 pm
- Location: Baton Rouge, LA.....aproaching retirement


Re: Fuel Filter Replacement.
what to do if I did not make the marks before removing the fuel plate?
could anyone show me how it should be fitted?
could anyone show me how it should be fitted?

Re: Fuel Filter Replacement.
Alan,
This may or may not be relevant because my experience is with having replaced (X2) the fuel filter on my 1150RT. I notice from taosports picture that he was able to remove the fuel plate from the tank and leave the vent lines connected to the plate (in his picture the 2 vent lines are at 9 o'clock on the fuel plate). If that is the case with yours then you can ignore what follows.
To get all the gadgetry attached to the fuel plate out of the tank I had to remove the vent lines from the fuel plate. If this is the situation you are confronted with you have to -
1) mark which vent line goes on which pipe
2) remove the single use clamps on each vent line to get them off. This means you need to replace the clamps when you reattach the vent lines. Because these vent lines aren't pressurised you can use stainless steel 5/16" hose clamps (ie no need for FI hardware here) to secure the vent lines back on to the pipes. When fitted to their respective pipes these hose clamps are just a bit wider than the originals and so may foul the edge of the tank cutout when you try to get the plate back onto the tank. If this happens you can either take to the fuel plate with a large hammer (not recommended) or loosen off then rotate (a touch) each hose clamp on its vent line. There may be a bit of trial and error here but doing so allowed me to get all the gadgetry on the fuel plate back through the tank cutout.
My fuel plate with attached gadgetry is shown below. Remember this is from an RT and noticeably different to taosports.

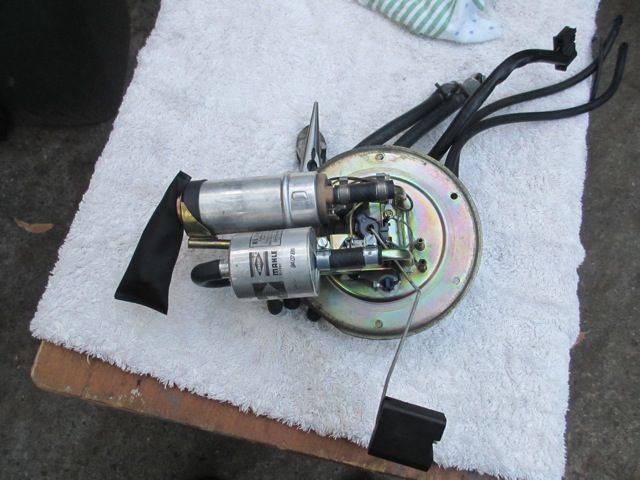
Ian
This may or may not be relevant because my experience is with having replaced (X2) the fuel filter on my 1150RT. I notice from taosports picture that he was able to remove the fuel plate from the tank and leave the vent lines connected to the plate (in his picture the 2 vent lines are at 9 o'clock on the fuel plate). If that is the case with yours then you can ignore what follows.
To get all the gadgetry attached to the fuel plate out of the tank I had to remove the vent lines from the fuel plate. If this is the situation you are confronted with you have to -
1) mark which vent line goes on which pipe
2) remove the single use clamps on each vent line to get them off. This means you need to replace the clamps when you reattach the vent lines. Because these vent lines aren't pressurised you can use stainless steel 5/16" hose clamps (ie no need for FI hardware here) to secure the vent lines back on to the pipes. When fitted to their respective pipes these hose clamps are just a bit wider than the originals and so may foul the edge of the tank cutout when you try to get the plate back onto the tank. If this happens you can either take to the fuel plate with a large hammer (not recommended) or loosen off then rotate (a touch) each hose clamp on its vent line. There may be a bit of trial and error here but doing so allowed me to get all the gadgetry on the fuel plate back through the tank cutout.
My fuel plate with attached gadgetry is shown below. Remember this is from an RT and noticeably different to taosports.
Ian
60% of the art of conversation is knowing when to say nothing