Page 1 of 2
Head removal adventure
Posted: Mon Feb 28, 2011 2:41 pm
by AndyRR
Doing some prep work for a ride down south in April. I figured it is time to do a little investigation and figure out why the bike requires 93 octane. I suspect that the cylinder heads and pistons are carbonized. Time for a little pre-spring cleaning.
CycleRob made this look ridiculously easy, so off I go.
First I find a broken o-ring on the air intake. I suppose this could cause a problem, but I'm not sure. Either way, I'll be off to Bob's before this is done.

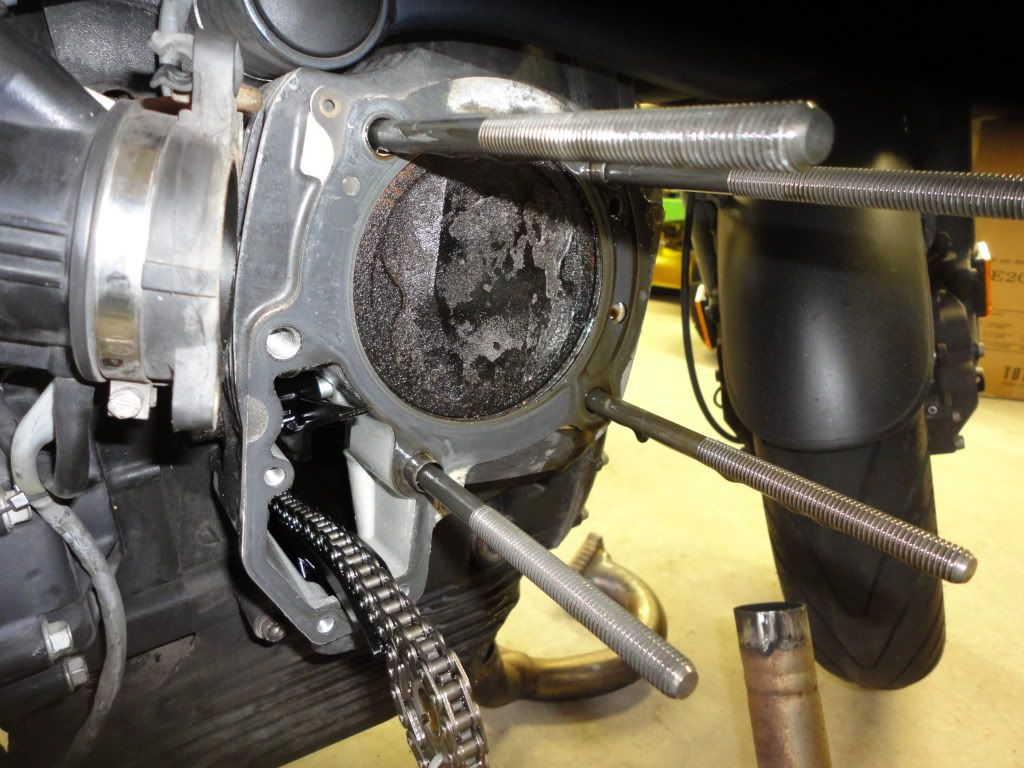
The manual says the cam chain tensioners have to come out. Problem is the exhaust is keeping it from coming all the way out:

I guess the exhaust has to come off anyway. The two nuts come off easily, but I have been unable to separate the exhaust from the head. Many whacks (pronounce the "h") with a rubber mallet are to no avail. I'll move ahead and see if it's easier once the head is loose. The tensioner is still pushing slightly on the chain, but most of the pressure has been relieved.
Then I run into the cam chain sprocket.

Trying to turn this without the motor locked is useless, so I use my substitute for BMW tool # 112 650:

The flywheel is now immobilized and I am free to apply torque. A lot. I'm going to break something torque. No dice. Am I missing something here or should I just torque away? Is it reverse thread??
Re: Head removal adventure
Posted: Mon Feb 28, 2011 2:59 pm
by hank
Some more info here from the UkGSers forum guru Steptoe.
http://www.ukgser.com/forums/showthread.php?t=93209
Re: Head removal adventure
Posted: Mon Feb 28, 2011 4:31 pm
by AndyRR
Thanks Hank - that gave me the confidence to crank. It let loose with a SNAP! Had to take a quick inventory to see what broke. All was well. The exhaust never did come off the right side. Left side came off while I was banging on the right.

Looks like I have quite a bit of carbon. Assuming the head gasket can't be re-used.
Re: Head removal adventure
Posted: Mon Feb 28, 2011 6:02 pm
by Lion_Lady
We're not far away from you... check your PMs.
P
Re: Head removal adventure
Posted: Tue Mar 01, 2011 7:54 pm
by AndyRR
Head gaskets are about $45. Each. @#$%. Bob didn't have 8 valve seals, but had everything else. Wasn't sure I wanted to pull all the valves as the machine was running OK, but it seems a shame to not pull them if I'm in it this deep. Bought a few wire wheels, an 8mm socket allen, and some valve compound. Hopefully the cleaning can start in earnest tomorrow.
Re: Head removal adventure
Posted: Tue Mar 01, 2011 9:02 pm
by sweatmark
Andy - how many miles on your bike?
I don't know enough to say whether that amount of buildup is high/low/normal... would be interested in the answer.
Re: Head removal adventure
Posted: Wed Mar 02, 2011 3:16 pm
by AndyRR
It has about 54k on it. Cleaned one piston this am before work. The deposits were THICK in the valve cutouts. Had to chisel them out with a small screwdriver, then follow up with the wire wheel to remove any scratches. With the exception of a couple tanks, it's only had 93 and I put about 2-3 cans of Seafoam through it a year.
It's a pita working around the four studs, but I don't want to pull them. I've also tried my best to cover the chain and the hole that it sits in. Lots of little carbon bits flying around. The tiny bits of wire coming off the wire wheel are OK cause they all go straight for the eyes and away from the engine.
Re: Head removal adventure
Posted: Wed Mar 02, 2011 7:32 pm
by iowabeakster
I feared the worst when I saw the post title... I was expecting the bloody decapitation kind.
"wire bits go straight for the eyes"... good stuff!
Keep us informed.
Re: Head removal adventure
Posted: Fri Mar 04, 2011 2:01 am
by CycleRob
AndyRR, I hope you have been careful to avoid using the wire wheel on the Aluminum head's gasket surface. There isn't any carbon there and the wire wheel could remove some material, wrecking the surface flatness and finish.
I know exactly what you meant when you said it was "I'm gonna break something torque". Had the same thing happen, fearing either the camchain would snap -or- the bowed arc of the plastic chain guide would snap. A broken or stretched camchain would be a disaster, necessitating the crankcases be split to change the chain(s). For the carbon granule/dust clean-up I used lots of WD-40 on the dirty parts and a shopvac to remove it. It's a great solvent, parts wash and lubricant that will burn away quickly. It is especially important to vacuum out then spray-n-vacuum the grit between the piston and cylinderwalls. The Sept 2004 album of 31 pics when I removed my 2002 R1150R's cylinderheads is
HERE. The post that went with those pics dissolved in the Byte bucket along with the old EZBoard hosted website we originally had.
Re: Head removal adventure
Posted: Sat Mar 05, 2011 12:41 pm
by AndyRR
The saga continues. Cylinder is clean

I also cleaned the valve side. I have four valve seals, so I'll need to decide if I want to pull all the valves or just some.
Here's the mystery part of the day. The squarish piece of black plastic in the top left corner. It just sits there and no fasteners hold it in place:

The carrier is held in place with a couple allens

I have a nice valve compression tool, but its made for automotive applications and its too big for these valves. I learned this method in my alternative engineering classes:

I stuffed a clean rag beneath the valve on the bench to limit movement. Once compressed I use a magnet to grab the keepers and out it comes. I'll need a helper or the correct tool to put this back together.
This intake valve is caked with crud.
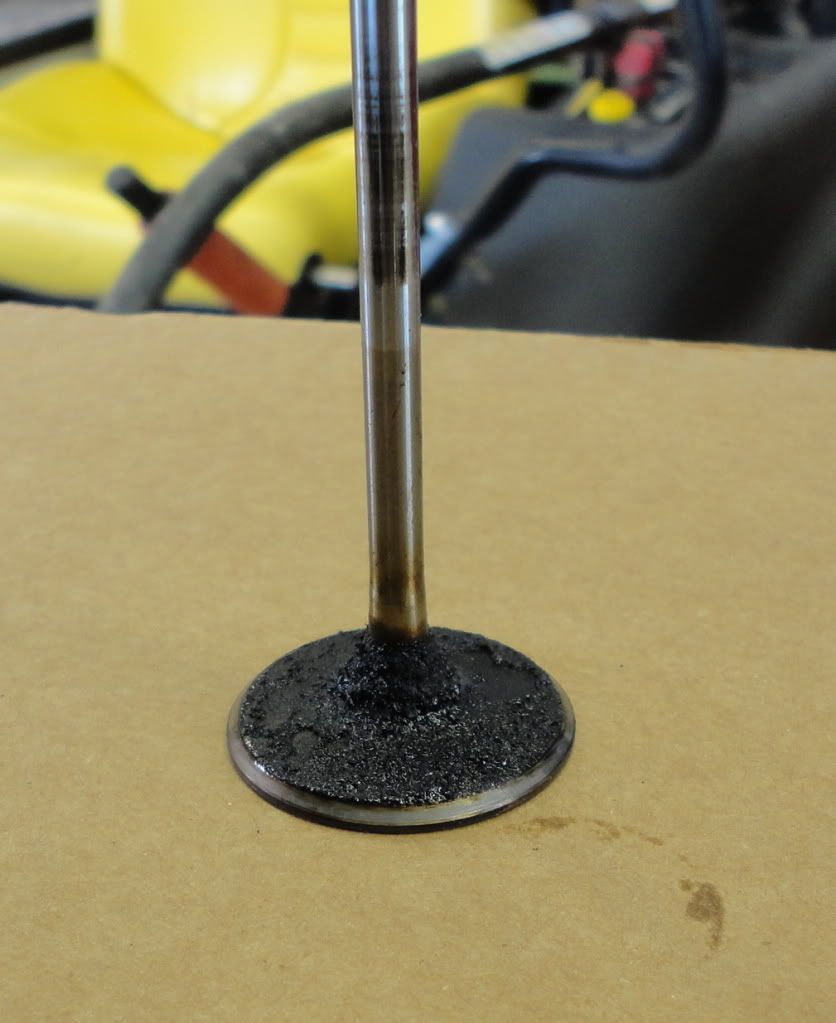
I'm not too crazy about wire wheeling these valves, so I'm experimenting with some different solvents. Starting with cheap scotch - I'll check back in an hour or so.

Re: Head removal adventure
Posted: Mon Mar 07, 2011 7:57 am
by AndyRR
After talking to a friend with experience cleaning valves, I was told that there is no problem wire wheeling the hardened steel of the valves. That made it easy (and scotch has better uses). Here's a cleaned and ground valve.

Here's a great tip I got from a service tech at Bob's BMW. To avoid damaging the new valve seal, use a bit of shrink wrap over the top of the valve. It can be used over and over.

Having the right tool makes this easy. $60

Here's an exhast valve:

Now the right side is ready to be put back together. I only had 4 valve seals, so I'll put everything back together and get it back in running condition before starting on the left side. If I screwed something up, this will also help me to know which side to start at.
Re: Head removal adventure
Posted: Wed Mar 09, 2011 11:12 am
by sweatmark
Andy-
Thanks for posting the info and inspiration.
Where'd you get that valve compression tool?
Re: Head removal adventure
Posted: Thu Mar 10, 2011 12:30 am
by CycleRob
About the valve spring remover, you may want to check with many auto parts store chains, many of which will have very inexpensive or free tool loan programs. No sense buying a $60 tool you'll use once. There are more inexpensive one's (I have one) that work just as well.
Re: Head removal adventure
Posted: Thu Mar 10, 2011 7:35 am
by AndyRR
I got the valve spring tool from Advanced Auto. I can return it for a full refund if I want. I may do that. I really like Advanced.
But..... I seem to have botched something. I've checked and double checked and verything seems correct. Won't run. Right side isn't firing, left side (untouched) is. I have compression, spark, fuel and the timing appears to be correct. I was careful to keep the chain tie-wrapped to the cam chain sprocket and lined up the notch as it went together. Valve gap was set with the head off and re-verified after install. I verified that the timing is correct (within 1 degree or so) with the left side. Turned the motor over by hand before attempting a start, so nothing has collided. I started it briefly before installing the exhaust and it did run. Installed the exhaust headers and the cat and started it again with great confidence. I was stunned when it wouldn't start.
Scratching my head over here...

Re: Head removal adventure
Posted: Thu Mar 10, 2011 11:03 am
by b12bandit
Fascinating stuff and wonderful pix.
I'd love to have a go at that sort of work but in 40+ years of motorcycling I've discovered I'm quite good at taking things apart. Lousy at putting them back together. I wish I had a fraction of your skills and knowledge.
Cheers
PETE
BEDFORDSHIRE
UK
Re: Head removal adventure - help!!
Posted: Fri Mar 11, 2011 7:59 am
by AndyRR
Took everything on the right side apart, inspected and put it back together. The engine turns nicely by hand and the valves are cycling as they should. The timing appears to be correct, but considering that it doesn't run, something isn't right. I'm suspicious of the valve timing as I haven't touched spark timing. The cam sprocket never left the chain and the notches have been carefully lined up. I paid extra attention to the chain guides and they appear to be fine.
A curious thing I noticed is that when the engine is turned by hand with the key on, the injector activates several times during a cycle. I would expect it to activate as the intake valves open, but it goes another 3 or 4 times during a cycle. It's probably nothing and has something to do with turning by hand, but it was a little unusual.
I'm running out of ideas so any advice or ideas would be appreciated. I'm certain that I will be thoroughly embarrased by some stupid mistake.
TIA
Re: Head removal adventure
Posted: Fri Mar 11, 2011 11:13 am
by zbodan
Andy, you did put the ignition coils back on your plugs, right?
I don't know if you're out of your mind and could forget something so simple.

Re: Head removal adventure
Posted: Sat Mar 12, 2011 12:17 pm
by AndyRR
Made some progress by intentionally turning the camshaft sprocket out of alignment with the camshaft marks. I know that they are SUPPOSED to be aligned, but my best guess is that the cam chain is stretched somewhat. I would say that it was 5 degrees or so out when I got it running well enough to take it for a quick spin and idle at normal idle setting. It's still a little lumpy though. It may take some more tweaking, but at least it is running well enough that I wouldn't have to trailer it to Bob's in order to trade it in....
Re: Head removal adventure
Posted: Sun Mar 13, 2011 2:52 am
by CycleRob
The camchain never left the cam sprocket, but the chain could jump a tooth or 3 on the intermediate shaft's drive sprocket if the chain fell down into the tunnel. You have to line up the sprocket mark lines horizontally with the crankshaft at TDC. Once that is aligned, the cam sprocket can then be slightly turned via the front pulley bolt to align the camshaft notch with the very nearby sprocket tab.
Another possibility is that the cam timing was correct on reassembly -but- the right side throttle cable was pulled up-n-out of the adjuster ferrule, holding open the right butterfly, causing it to run only on the left cylinder. The TPS is on the left cylinder and it determines the fuel quantity injected. If only the right butterfly is opened it adds extra air without extra fuel and the right cylinder totally misfires, even at an idle, because it was erroneously held open by the pulled out throttle cable. Give it a look-see and get back to us.
Re: Head removal adventure
Posted: Sun Mar 13, 2011 12:03 pm
by AndyRR
CycleRob - If you are ever in MD, please let me buy you dinner. The throttle cable was out of it's ferrule! It sits up against, so it isn't obvious. I had cam chain sprocket in proper alignment with the notch last night, so everything was set up correctly. Ferrule in place and it started up beautifully!!
THANK YOU!!!!!